Data … as usual

All things about data by Laurent Leturgez

Configure SQLDeveloper for Postgres, MySQL/Mariadb, SQL Server, and teradata

In my job, I usually work with other rdbms like postgres, sql server, teradata etc. But I usually use SQL Developer as an IDE.

In this post I will explain how to configure SQL Developer if you want to connect and use it with other rdbms than Oracle:

sqldeveloper


Step 1 … Download and Install SQL Developer

SQL Developer is available for download at this URL: https://www.oracle.com/technetwork/developer-tools/sql-developer/downloads/index.html

Download the version you want and install it (I don’t explain how to proceed here … I’m sure you’re smart enough to do that alone ! 😉 )

Once downloaded, installed, then executed, you can add new connection but only to Oracle databases:


Step 2 … Download libraries

To be configured for other rdbms, SQL Developer need extra libraries, and more precisely extra jdbc libraries for the required rdbms.

Depending on the target rdbms, you will have to download these libraries :

Postgres

Download the jdbc driver enclosed in a jar file for postgres. Jar files are available at this URL : https://jdbc.postgresql.org/download.html

I recommend to download the 42.2.5 JDBC 42 driver, but download the driver you need depending on your PG Server version, your JDBC driver version etc.

MySQL / MariaDB

Configuring SQL Developer to be able to connect to mysql or mariadb server need mysql Connector / J available at this URL: https://dev.mysql.com/downloads/connector/j/

Download the “Platform Independant” connector, and extract the jar file included in the archive/zip file. When writing this blog post the last version was mysql-connector-java-8.0.16, and the required jar file was mysql-connector-java-8.0.16.jar.

SQL Server / Sybase

Download the jTDS jar file at this URL: https://sourceforge.net/projects/jtds/files/, and extract the jar file included in the zip file. (jTDS is described here: http://jtds.sourceforge.net/).

Note: the jTDS is a bit older, and I didn’t use it to connect to recent version of MSSQL (including in the Azure Cloud). It will required some tests.

TeraData

To be able to connect a teradata database with SQL Developer, you need to download the jdbc driver for teradata. These drivers are available at this URL: https://downloads.teradata.com/download/connectivity/jdbc-driver. (It’s free but you will need an account to download it.).

Once downloaded, you will need both jars included in the zipfile. (terajdbc4.jar and tdgssconfig.jar).

Step 3 … Configure SQL Developer to use these third-party JDBC Drivers

First of all, you will have to put all the needed jars in a folder (somewhere in the sqldeveloper subfolders). In my case, I put them in the $SQLDEV_HOME/jdbc/lib directory.

Then, you’ll have to add the needed third party librairies in SQL Developer.

To do that, Menu “Tools”/”Preferences”, and select “Database” and then click on the “Third Party JDBC Drivers”.

Now, you have just to add new entries by selecting the needed jar files :

sqldeveloper


Step 4 … Create new connections from these third-party drivers

Now, when we create a new connection, the “Database Type” Menu contains more entries:

sqldeveloper

Once selected, the GUI changes a bit with the required fields to connect to the database type you chose.


That’s it for today 😉

creating a VM instance on the OCI with Python (prework)

In a previous post, I explained how to deal with python and the OCI (Oracle Cloud Infrastructure). In this previous post, I wrote a basic script to put and get some files stored into an object storage bucket.

But, with Python and OCI, you can also create some VM instances (and much more funny stuff).

In this article I will present the basics to do before creating a VM Instance (The VM instance creation process will be described in a next blog post).

Principles

As previously written, creating a resource in OCI with Python is almost always the same :


$ cat ~/.oci/config
[DEFAULT]
user=ocid1.user.oc1..aaaaaaaamcel7xygkvhe....aaaaaaaaaaaaaaaaaaaaa
fingerprint=35:aa:aa:aa:aa:aa:aa:aa:aa:aa:aa:aa:aa:aa:aa:aa
key_file=~/.oci/oci_api_key.pem
tenancy=ocid1.tenancy.oc1..aaaaaaaahgagkf7xygkvhe....aaaaaaaaaaaaaaaaaaaaa
region=eu-frankfurt-1

  • Load it into your python program
import oci
config=oci.config.from_file()
  • Use the correct OCI Python SDK Client

In the Python SDK, you have various clients you will be able to use to deal with specific task. Each client is part of a service (Core, Compute, Database etc.)

For example:

In addition, in each service, you have some models that are used to configure your client or the resource you will create through the use this client. For example, when creating a subnet, we will use the VirtualNetworkClient object and specially the create_subnet function. But as parameters, we will give a model object for this subnet (this object will be configured with all the details of the subnet : CIDR, availability domain, tags etc.) … If it’s more understandable for you to read python code … we’ll see this is the next sections.

  • Ids Ids Ids … you will have to know all the required IDs (or OCID) for each container that will own the resource you will create.

The main OCIDs to get are:

    • the compartment OCID where you will create your VCN
    • The VCN OCID you will get once created

Of course, all the OCIDs required to configure your OCI client have to be known.. but already used in the first step.

Virtual Cloud Network (VCN) creation

To create a VCN, you will need various information. The main ones are :

  • The compartment OCID where your VCN will be created
  • A display name
  • and a CIDR block for the VCN

Once you got this, you can execute the VCN Creation (you can notice that we used a model to describe our VCN):

import oci
config=oci.config.from_file()
virtual_network_client = oci.core.VirtualNetworkClient(config)
vcn_name = 'PREMISEO-VCN'
my_compartment_id="ocid1.compartment.oc1..aaaaaaaawbbbbbbbbbbbbccccccFAKE_OCID_sa3p6q"
cidr_block='10.10.10.0/24'

result = virtual_network.create_vcn(
        oci.core.models.CreateVcnDetails(
            cidr_block=cidr_block,
            display_name=vcn_name,
            compartment_id=my_compartment_id
        )
    )

Once the command is executed, the process of creating the VCN is executed asynchronously.
So, if you want to be acknowledged when the process is terminated, it’s better to use the wait_until function from the oci package:

v_response = oci.wait_until(
        virtual_network,
        virtual_network.get_vcn(result.data.id),
        'lifecycle_state',
        'AVAILABLE'
    )
print('The VCN has been created with ID: ',v_response.data.id)

If you are curious, you can print the v_response.data associative array content and get all the details of your VCN.

Finally, note the returned OCID that identifies your VCN (You can get it from the OCI web console). It’s the only identifier for your VCN, if your rerun the same block code, you will create another VCN with the same properties (name, CIDR etc). The only difference will be the OCID.

Subnet Creation

Once you created a VCN, you can now create a subnet inside this VCN.

It’s the same principle as creating a VCN, the only difference is that you will need to give the VCN OCID and the compartment OCID, because these components host the subnet you will created.

Subnet creation is done through the VirtualNetworkClient object, like this:


config=oci.config.from_file()
virtual_network_client = oci.core.VirtualNetworkClient(config)
my_compartment_id="ocid1.compartment.oc1..aaaaaaaawbbbbbbbbbbbbccccccFAKE_OCID_sa3p6q"
my_vcn_id="ocid1.compartment.oc1..bbbbbbbbrccccccccccccddddddFAKE_OCID_bsu79z"
sub_cidr_block='10.10.10.0/24'
my_availability_domain='EUUz:EU-FRANKFURT-1-AD-1'
subnet_name='PREMISEO-VCN-subnet1'

result = virtual_network.create_subnet(
        oci.core.models.CreateSubnetDetails(
            compartment_id=my_compartment_id,
            availability_domain=my_availability_domain,
            display_name=subnet_name,
            vcn_id=my_vcn_id,
            cidr_block=sub_cidr_block
        )
    )
# Same thing here, we are waiting for the response property "lifecycle_state" to be set on "AVAILABLE". 
# This will keep us informed the resource is now available. 
s_response = oci.wait_until(
    virtual_network,
    virtual_network.get_subnet(result.data.id),
    'lifecycle_state',
    'AVAILABLE'
)
    print("The subnet has been created with ID: ", s_response.data.id)

Internet Gateway (IG) Creation

The last step to do before creating new VM instance is optional but needed when you want to connect your VM on the internet. It’s to create an Internet Gateway on your VCN and add a network rule to target this gateway.

Gateway creation

The IG creation follows the same process as previously used for VCN and subnet creation.

To create it, you will need some OCIDs like compartment OCID and VCN OCID, it’s done though the VirtualNetworkClient object, and you will a display name to configure it with the use of IntenetGateway model.


internet_gateway_name='premiseo_GW'
config=oci.config.from_file()
virtual_network_client = oci.core.VirtualNetworkClient(config)
my_compartment_id="ocid1.compartment.oc1..aaaaaaaawbbbbbbbbbbbbccccccFAKE_OCID_sa3p6q"
vcn_id="ocid1.compartment.oc1..bbbbbbbbrccccccccccccddddddFAKE_OCID_bsu79z"

result = virtual_network.create_internet_gateway(
        oci.core.models.CreateInternetGatewayDetails(
            display_name=internet_gateway_name,
            compartment_id=my_compartment_id,
            is_enabled=True,
            vcn_id=vcn.id
        )
    )
IG_response = oci.wait_until(
    virtual_network,
    virtual_network.get_internet_gateway(result.data.id),
    'lifecycle_state',
    'AVAILABLE'
)
print("Created internet gateway: ", IG_response.data.id)

Network rule creation and association with IG

Create a network rule is done through a model called RouteRule made of two properties :

  • the CIDR Block associated with this rule
  • the Object OCID associated with this rule (Here the Internet Gateway OCID)

After creating the RouteRule model, we need to get the route table and append the new rule to it, and then update the new route table.

This is done by the following code block:


internet_gateway_name='premiseo_GW'
config=oci.config.from_file()
virtual_network_client = oci.core.VirtualNetworkClient(config)
my_compartment_id="ocid1.compartment.oc1..aaaaaaaawbbbbbbbbbbbbccccccFAKE_OCID_sa3p6q"
vcn_id="ocid1.compartment.oc1..bbbbbbbbrccccccccccccddddddFAKE_OCID_bsu79z"

# #### Routing rules retrieving
# First, we get the VCN Object from the vcn OCID
vcn=virtual_network_client.get_vcn(vcn_id=vcn_id)
# Then the route table (as response Object)
route_table_resp= virtual_network_client.get_route_table(vcn.data.default_route_table_id)
# And Finally the route rules
route_rules = route_table_resp.data.route_rules

# Another way to proceed ... a one line command but a bit more complex to read 😉
route_rules = virtual_network_client.get_route_table(virtual_network_client.get_vcn(vcn_id=vcn_id).data.default_route_table_id).data.route_rules

# #### Now we append the new network rule to the previously route_rules object
route_rules.append(
        oci.core.models.RouteRule(
            cidr_block='0.0.0.0/0',
            network_entity_id=IG_response.data.id
        )
    )

# #### Finally we update the VCN with the new routing table
virtual_network.update_route_table(
        vcn.default_route_table_id,
        oci.core.models.UpdateRouteTableDetails(route_rules=route_rules)
    )

get_route_table_response = oci.wait_until(
    virtual_network,
    virtual_network.get_route_table(vcn.default_route_table_id),
    'lifecycle_state',
    'AVAILABLE'
)

Ok, now we have an environment ready to host our VM instance. In a next post, I will describe how to create a VM instance on the OCI by using Python SDK.

That’s it for today 🙂


Playing with Python and Machine Learning in the Cloud … for Free

If you are interested by the Python language and Machine learning programming (which is usually linked), you will probably think about configuring an environment on your laptop or instantiate an environment hosted by a Cloud provider, which is a bit expensive especially if you want doing some very basic tests.

If you want to try (and build) those very trendy neural networks, you will need a GPU to speed up your programs (and some related boring stuff like installing and configuring Cuda etc.). Same thing if you want to play with spark (and specifically with pyspark)

That can be a boring stuff to do. But do you know that it’s possible to quickly set up an environment in the cloud for free … yes for free. So let’s have a look to two solutions : Google colaboratory (named colab) and Kaggle.

But before we start, we need to know what a notebook is, because these platforms use python notebook as playground.

What is a notebook ?

A notebook is a file which embed code, markup language (HTML) and equations. Each notebook is divided by cells and each cell can be executed individually inside a kernel.

When the code is python, the file extension is usually ipynb. Please note, that notebooks can run other languages than python, each kernel run a specific language for example, Python or Scala.

If you want to know more about notebook, follow these links: https://jupyter.org/ or https://en.wikipedia.org/wiki/Notebook_interface.


Google Colaboratory (Colab notebooks)

Google colab is a free notebook environment hosted by Google. To access it, you only need a free google account. Once you created your notebook, you have the possibility to save it on a Google drive file (with ipynb extension) and, optionally, export it on github.

To create your first notebook, you have to go to https://colab.research.google.com/notebooks/welcome.ipynb and then click the “File” Menu and Select “new Python 3 notebook” (or New Python 2 Notebook, if you want to deal with python 2).

Colaboratory Notebook 1

This will create a new folder in your google drive home root directory named “Colab Notebooks” with the file you created in it.


Once in your notebook, you can add some cells and write your first python lines.

But, what you have to know is that you are in a remote environment with packages installed (by default you have many python packages already installed), and once instantiated, you can even modify your kernel by installing new softwares etc.

For example, let’s say … we want to set up a pyspark environment. We first need to install pyspark with pip and then run a bunch of pyspark code to test everything is ok.

The notebook is available at this URL (I saved it on github): https://github.com/lolo115/python/blob/master/notebooks/google_colab/blog/pyspark1.ipynb, and the result is represented below:


Colaboratory Notebook 2

You can even load files from your local disk to your runtime, and then run code on it. In the example given below (and integrated in the notebook linked above), I used the google API to do that:

Colaboratory notebook 3

Of course, this environment is for testing purpose only, you don’t have a lot of power behind but it’s useful if you want to start learning Python, or test a bunch of script without any local infrastructure and … it’s free.

Kaggle

The second platform to start playing python is more machine learning oriented. Indeed kaggle is a platform for data scientists who are allowed to share and find some data sets, build model, enter in datascience challenges etc.

Accessing to kaggle is free, you just have to subscribe at www.kaggle.com and then log in.

Once logged into the system, you have to go to www.kaggle.com/kernels and click on “New Kernel” and select your preferred style, and you will have access to a notebook with default packages loaded (like numpy and pandas) :

Kaggle

Basically, kaggle is not very different from Google Colaboratory … but kaggle is interesting because you can enable a GPU for your notebook.

To do that, you can go to the “settings” area (in the bottom right corner) and set “GPU” to “ON”.

Kaggle

This will enable a GPU (ok it’s not a farm 😉 ) but this can help you to work on small workload and why not on a small neural network.

Below, a small bunch of code that use tensorflow and gives you the information about GPU enablement.


Please note that you can easily upload your datasets (or use datasets provided by kaggle) by clicking on the “+ Add Dataset” Button

That’s it for today 😉


Colors identification for images stored in the Cloud with Python

I recently worked on some Python code to detect which are the main colors in an image.

To do that, my images were stored in an Oracle Cloud Infrastructure block storage bucket.

The process had to be done in 3 steps:

  • I had first to extract them by using the “oci” python package.
  • Then I had to convert the unstructured binary image to a structured numpy array.
  • And finally, I used an unsupervised ML routine (KMeans Clustering) to analyze the numpy array and detect which were the main colors in this image.

Reading Images stored in an OCI block storage bucket

To read images, or more generally, files store in  an OCI block storage bucket. You need to have configured your client environment to access the OCI.

To do that, you will need various OCIDs (user, tenant), some keys (private and public). I will not develop this part because I already did it in a previous post … see here !

Once your configuration is ok, you have to load it into your python script, get an ObjectStorageClient object from the configuration, and request the namespace data of your ObjectStorageClient.

After that, it becomes easy to read an object (file) inside a bucket referenced inside the namespace.

This is done by the following code


compartment_id = config["tenancy"]
object_storage = oci.object_storage.ObjectStorageClient(config)
namespace = object_storage.get_namespace().data

bucket_name="python-bucket"
object_name="union_jack.jpg"
my_object = object_storage.get_object(namespace,
                                      bucket_name,
                                      object_name)

print("type(my_object.data.content) = ",type(my_object.data.content))

As you can see, I printed the class type of the object content … and without any surprise, it’s a “bytes” class.

type(my_object.data.content) =  <class 'bytes'>

Note: If your images are stored by another cloud provider. They usually have a Python SDK in order to do the same things 😉

Converting an unstructured binary image to a numpy array

Once I did that, if I want to process my image I have to convert it in a usable data structure. And, with Python, the best data structure to process images is a numpy array, so I had to find a way to convert my binary soap (Bytes) to a structures numpy array.

As I don’t want to use a temporary file to do that stuff, I used a BytesIO object to process them directly in memory. At the end of the stream, I used a pillow Image (new name for the deprecated PIL package) from the BytesIO stream.

After that, a conversion to a numy array was possible. Please note that I had to convert a bit my numpy array structure. As you may know, an image file is represented in a multi-dimension array.

The first two dimensions represent the pixels of your Image. Added to that, you have 3rd dimension which encode for Red, Green and Blue values of each pixel. Sometimes a fourth value is added for what is called “Alpha” which is intended in transparency encoding. As I don’t know how were encoded Images, and as I don’t need to process the Alpha layer, I converted my 3 or 4 layers array into a 3 layers array (R,G and B encoding only).

The following code do the stuff:


from PIL import Image
from io import BytesIO

im=Image.open(BytesIO(my_object.data.content))
img=np.array(im)[:,:,:3]
print("img.shape=",img.shape)

This will produce the result below:

img.shape= (640, 1280, 3)

So my image is represented by a numpy array (ndarray). my image width is 640 pixels, height is 1280 pixels and each pixel is encoded by 3 values for Red, Green and Blue.

Using a clustering ML algorithm to detect colors

Next step, but not least. We have to choose a method to detect colors in the image.

First, I thought about getting the “average” color, but doing this is not a good way, because in the case of your image is equally colored by yellow, blue, red, and green … your average color will be a crappy brown which is not realistic.

The best way to get colors is to run a unsupervised machine learning algorithm (K-Means) to group all your colors into clusters based on R, G and B values. No matter the ML framework you will use to execute the KMeans, after execute your program you will get, the center point of each cluster which represent the color associated with the cluster and the differents labels for your clusters. Then you will be able to count the number of occurence of your label, and you will get the number of points inside your cluster.

It becomes easy to count the number of points in each color, this is for the most important thing in this algorithm. The other key point is how to structure your data as input for your KMeans.

This is simply resolved by flattening your image representation (in the numpy array). The array is flatten to a one-dimension list of triplets (reprensenting your RGB values).

In the following code, I used opencv (cv2 package) which is often used for image detection and capturing. This package is delivered with a kmeans algorithm that is optimized for image processing.


import cv2

# pixels is the 1D array, results of the img flattening process (made by reshape function)
pixels = np.float32(img.reshape(-1, 3))
print("Pixel shape = ", pixels.shape)

# Here is the number of colors we are trying to detect.
n_colors = 5

# Opencv kmeans parameters (See the following URL for more information: 
# https://docs.opencv.org/3.0-beta/doc/py_tutorials/py_ml/py_kmeans/py_kmeans_opencv/py_kmeans_opencv.html
criteria = (cv2.TERM_CRITERIA_EPS + cv2.TERM_CRITERIA_MAX_ITER, 200, .1)
flags = cv2.KMEANS_RANDOM_CENTERS

# palette represents clusters centers
# Labels represents the cluster labels.
#   As we have 5 colors, labels are 0,1,2,3,4 
_, labels, palette = cv2.kmeans(pixels, n_colors, None, criteria, 10, flags)
# And counts represents the number of occurence for each label
_, counts = np.unique(labels, return_counts=True)

# Our dominant color is the color that have the maximum number of occurence in the "counts" array
dominant = palette[np.argmax(counts)]
print("dominant color (RVB) =",dominant)

If you prefer to use tensorflow, the code below will do the stuff


import tensorflow as tf
# this is for removing all the tensorflow INFO and WARN messages
tf.logging.set_verbosity(tf.logging.ERROR)

# pixels is the 1D array, results of the img flattening process (made by reshape function)
pixels = np.float32(img.reshape(-1, 3))
print("Pixel shape = ", pixels.shape)

def input_fn():
    return tf.train.limit_epochs(tf.convert_to_tensor(pixels, dtype=tf.float32), num_epochs=1)

n_colors = 5

kmeans = tf.contrib.factorization.KMeansClustering(num_clusters=n_colors, 
                                                   use_mini_batch=False)

num_iterations = 20
for _ in range(num_iterations):
    kmeans.train(input_fn)
    print('Training ... score:', kmeans.score(input_fn))
    cluster_centers = kmeans.cluster_centers()

cluster_indices = list(kmeans.predict_cluster_index(input_fn))
counts=np.unique(cluster_indices, return_counts=True)[1]
palette=cluster_centers

dominant = palette[np.argmax(counts)]
print("dominant =",dominant)

Now we have our results, we are able to produce a nice plot with:

  • the initial picture,
  • the dominant colors gradient,
  • the main dominant color
  • the second dominant color (I did that because In the code I worked on, many pictures had a white background which was detected and the main color in 99% of the cases)

And to do that, I used the matplotlib library:


import matplotlib as mpl
%matplotlib notebook
from matplotlib import pyplot as plt

indices = np.argsort(counts)[::-1]  
freqs = np.cumsum(np.hstack([[0], counts[indices]/counts.sum()]))
rows = np.int_(img.shape[0]*freqs)

dom_patch = np.zeros(shape=img.shape, dtype=np.uint8)
main_patch=np.ones(shape=img.shape, dtype=np.uint8)*np.uint8(palette[indices[0]])
second_patch=np.ones(shape=img.shape, dtype=np.uint8)*np.uint8(palette[indices[1]])

for i in range(len(rows) - 1):
    dom_patch[rows[i]:rows[i + 1], :, :] += np.uint8(palette[indices[i]])

fig, (ax0, ax1, ax2, ax3 ) = plt.subplots(1, 4 , figsize=(9,6))
ax0.imshow(img)
ax0.set_title('Original')
ax0.axis('off')

ax1.imshow(dom_patch)
ax1.set_title('Dominant colors')
ax1.yaxis.set_major_locator(plt.NullLocator())
ax1.xaxis.set_major_locator(plt.NullLocator())

ax2.imshow(main_patch)
ax2.set_title('Main color')
ax2.yaxis.set_major_locator(plt.NullLocator())
ax2.xaxis.set_major_locator(plt.NullLocator())

ax3.imshow(second_patch)
ax3.set_title('Second color')
ax3.yaxis.set_major_locator(plt.NullLocator())
ax3.xaxis.set_major_locator(plt.NullLocator())
                                                                                                              
plt.show(fig) 

Please note that, this code was running inside a jupyter notebook … so adapt the code if you want to run it in another context.

This will produce that kind of result :


Dealing with Oracle Cloud Infrastructure and Python

Oracle provides various SDK to create resources in the OCI.

Recently, I played with the Python SDK for OCI. In this blog post, I will show you the basics to create a simple bucket in the Object Storage part of OCI, and simply put a file on this Bucket.

OCI Client configuration

First, you will need to install the python OCI package. The best for that is to create a python virtual environment, activate it, and install all the packages you need inside.


mbp:python_venv $ python -m virtualenv oci
Using base prefix '/Users/leturgezl/miniconda3/envs/general'
New python executable in /Users/leturgezl/python_venv/oci/bin/python
Installing setuptools, pip, wheel...
done.

mbp:python_venv $ source oci/bin/activate


(oci) mbp:python_venv leturgezl$ pip install oci numpy pandas

Now that packages are installed, we have to configure the client to access OCI.

To do that, we need many things :

  • User OCID: this can be found in the User’s Page in OCI
  • Tenancy OCI: this can be found in the Tenancy’s page in OCI
  • Your OCI region
  • A private key file, its public key, and the related fingerprint.

The keys have been generated like this (I used a key without passphrase)


# Private key generation

$ mkdir ~/.oci
$ openssl genrsa -out ~/.oci/oci_api_key.pem 2048
$ chmod go-rwx ~/.oci/oci_api_key.pem

# Public key generation
$ openssl rsa -pubout -in ~/.oci/oci_api_key.pem -out ~/.oci/oci_api_key_public.pem

# Fingerprint generation
$ openssl rsa -pubout -outform DER -in ~/.oci/oci_api_key.pem | openssl md5 -c

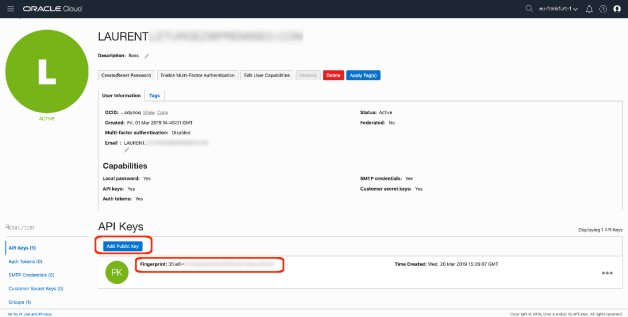
Once you did that, you will have to configure you user in OCI to add it the public key, the fingerprint given in the interface must match with the previous command:

OCI User 1


It’s important to keep your private key “private” (don’t send it to another people, or leave it without any protection on your laptop).

Now, your local environment is configured, we will need a dictionary structure in our python script to use the SDK.

This dictionary can be build manually and embedded in the code, then you will have to fill the required fields (Key file location is the private key location):

config = {
    "user": "ocid1.user.oc1..aaaaaaaamcel7xygkvhe....aaaaaaaaaaaaaaaaaaaaa" ,
    "key_file": "~/.oci/oci_api_key.pem",
    "fingerprint": "35:aa:aa:aa:aa:aa:aa:aa:aa:aa:aa:aa:aa:aa:aa:aa",
    "tenancy": "ocid1.tenancy.oc1..aaaaaaaahgagkf7xygkvhe....aaaaaaaaaaaaaaaaaaaaa",
    "region": "eu-frankfurt-1"
}

Or, you can configure a local “config” file in your ~/.oci/ directory and then load it in the code with the given python code below:


$ cat ~/.oci/config
[DEFAULT]
user=ocid1.user.oc1..aaaaaaaamcel7xygkvhe....aaaaaaaaaaaaaaaaaaaaa
fingerprint=35:aa:aa:aa:aa:aa:aa:aa:aa:aa:aa:aa:aa:aa:aa:aa
key_file=~/.oci/oci_api_key.pem
tenancy=ocid1.tenancy.oc1..aaaaaaaahgagkf7xygkvhe....aaaaaaaaaaaaaaaaaaaaa
region=eu-frankfurt-1

Note : you can embed more than one user profile in this file. The only one required is the DEFAULT profile.


>>> import oci
>>> import pandas as pd
>>> config=oci.config.from_file()
>>> df=pd.DataFrame.from_dict(config, orient='index')
>>> df
                                                                       0
log_requests                                                       False
additional_user_agent
pass_phrase                                                         None
user                             ocid1.user.oc1..aaaaaaaamcel7xygkvhe...
fingerprint              35:aa:aa:aa:aa:aa:aa:aa:aa:aa:aa:aa:aa:aa:aa:aa
key_file                                          ~/.oci/oci_api_key.pem
tenancy                     ocid1.tenancy.oc1..aaaaaaaahgagkf7xygkvhe...
region                                                    eu-frankfurt-1

You can read the oci config file and select another profile by using this:


config = oci.config.from_file(profile_name="laurent")

Or use another file by using this parameter


config = oci.config.from_file(file_location="~/OCI_config.uat")

You can see there are more parameters in the dictionary, you can find the details by reading this: https://docs.cloud.oracle.com/iaas/Content/API/Concepts/sdkconfig.htm.

Creating an Object Storage bucket in OCI

Now our client is well configured to access OCI through a user and his keys.

it’s really easy to create a bucket. We have to request an ObjectStorageClient object and use it to create the bucket:

import oci
from oci.object_storage.models import CreateBucketDetails

compartment_id = config["tenancy"]
object_storage = oci.object_storage.ObjectStorageClient(config)

namespace = object_storage.get_namespace().data
bkt_name = "python-bucket"
object_name = "python_file"

print("Creating a new bucket {!r} in compartment {!r}".format(bkt_name, compartment_id))
request = CreateBucketDetails()
request.compartment_id = compartment_id
request.name = bkt_name
bucket = object_storage.create_bucket(namespace, request)

This will produce that kind of output:

Creating a new bucket 'python-bucket' in compartment 'ocid1.tenancy.oc1..aaaaaaaahgagkf7xygkvhe...'

And in the OCI web interface, our bucket appeared :

OCI Bucket 1

Put a file into the Object storage bucket

Now we have a bucket created in our compartment, it’s easy to put a file on it (I’ll put a binary file which is a PNG file).

To do that, the below code will be enough (considering variables have been initiated by previous code parts … see above)


with open("images/myimage.png", mode='rb') as file:
my_data = file.read()

obj = object_storage.put_object(
namespace,
bkt_name,
object_name,
my_data)

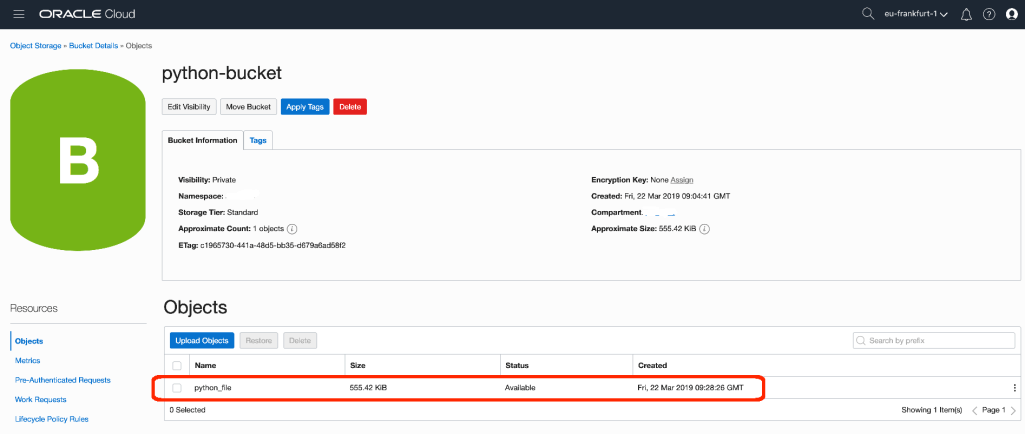
In the OCI console, inside the previously created bucket, the file has been created and is available:

OCI Bucket 2

As you can see, deploying resources on the OCI is easy and you can deploy your full infrastructure with a bunch of code.

Next investigations will be made soon, specially to deploy virtual machines, storage and databases of course.

That’s it for today 🙂